
AI chatbots have become essential tool for any websites nowadays. They improve user experience, provides instant support, and seamless customer interactions. Whether you’re running an e-commerce store, a blog site, or a business website ,adding an AI chatbot can take your website to the another level.
The good news? You don’t need to be a coder to build one! In this guide, I will take you through the process of making an AI chatbot for your website, step by step Guide. Let’s get started!
Why Add an AI Chatbot to Your Website?

Before starting the technical details, Lets quickly look at why AI chatbots are worth effort:
- 24/7 availability : Chatbots gives instant responses even the host is offline.
- Improved User Experience : They guide visitors, answer FAQ’s and resolve questions quickly.
- Cost Effective : Reduces the need for large customer support team.
- Data Collection : Chatbots can gather better insights about user behavior and preferences.
Now, lets build your AI Chatbot !!!
Step 1: Define the Purpose of Your Chatbot
Before diving in ask yourself:
- What is the primary goal of the chatbot? (e.g., customer support, lead generation, FAQs)
- Who is the target audience?
- What tasks should the chatbot handle? (e.g., answering questions, booking appointments, recommending products).
FABRIC Tip: Create a list of frequently asked questions (FAQs) or common user queries to guide the chatbot’s functionality.
Step 2: Choose a Chatbot Platform
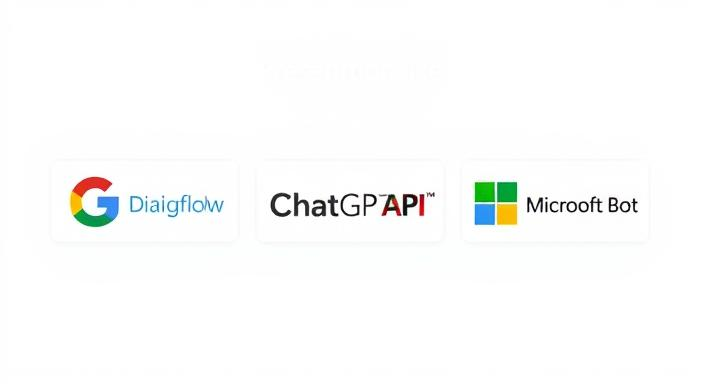
There are number of platforms available to build AI chatbots, even if you’re not a programmer. Here are some popular options:
- Dialogflow (by Google): Great for natural language processing (NLP) and integration with Google services.
- Microsoft Bot Framework: Ideal for building advanced chatbots with Azure AI.
- ChatGPT API: Perfect for creating conversational chatbots with OpenAI’s GPT models.
- Tidio: A no-code platform for beginners.
- Rasa: Open-source and highly customizable for developers.
For this guide, we’ll use Dialogflow as an example, but the steps are similar for other platforms.
Step 3: Design the Conversation Flow
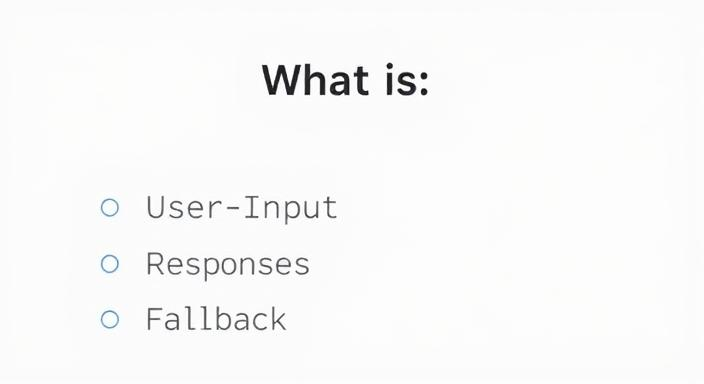
A good chatbot feels natural and intuitive. To achieve this, map out the conversation flow:
- Greeting: How will the chatbot introduce itself?
- User Input: What questions or commands will users type?
- Responses: How will the chatbot respond to different inputs?
- Fallback: What will the chatbot say if it doesn’t understand a query?
FABRIC Tip: Use tools like Whimsical or Lucidchart to create a visual flowchart of the conversation.
Step 4: Build the Chatbot
1. Create an Agent
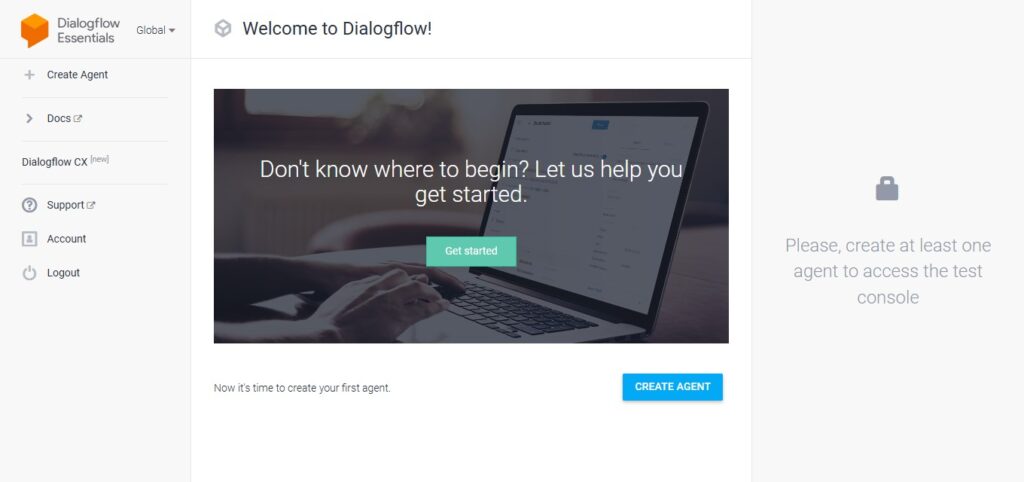
- Go to Dialogflow and sign in with your Google account.
- Click on Create Agent and give it a name (e.g., “MyWebsiteChatbot”
2. Create Intents

- Intents represent the purpose behind a user’s input (e.g., “Ask about pricing”).
- Click on Create Intent and name it (e.g., “PricingIntent”).
- Add training phrases (e.g., “How much does it cost?”, “What’s the price?”).
- Define the chatbot’s response (e.g., “Our pricing starts at $49/month.”).
3. Set Up Fallback Intents
- Create a fallback intent to handle unrecognized queries.
- Add a friendly response like, “I’m sorry, I didn’t understand that. Can you rephrase?”
4. Enable Small Talk
Go to the Small Talk section and enable pre-built responses for casual conversations (e.g., “How are you?”).
Step 5: Integrate the Chatbot with Your Website
Once your chatbot is ready, it’s time to add it to your website. Here is how:
1. Generate Embed Code
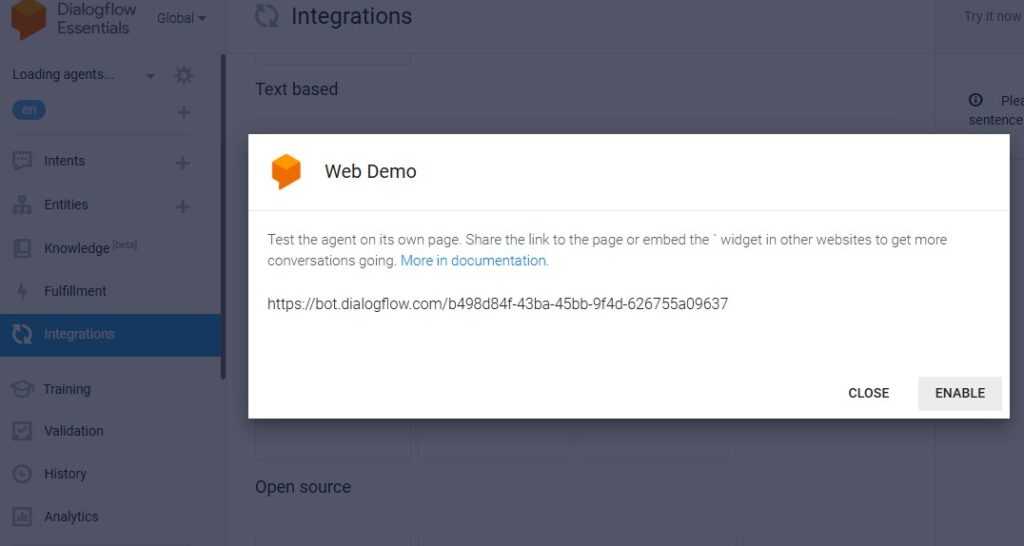
- In Dialogflow, go to Integrations and enable Web Demo.
- Copy the embed code provided.
2. Add the Code to Your Website
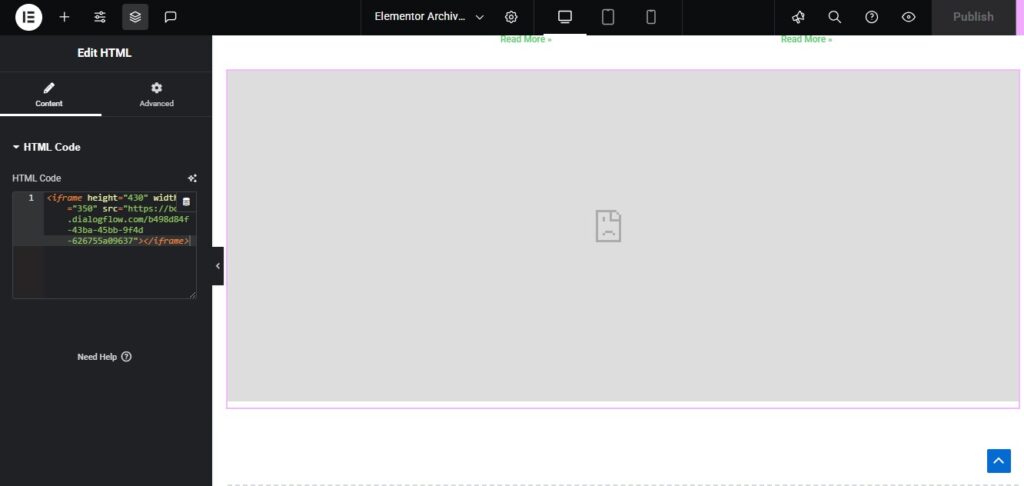
- Open your website’s HTML file or CMS (e.g., WordPress, Wix).
- Paste the embed code just before the
</body>tag.
3. Test the Chatbot
Open your website and interact with the chatbot to ensure it works as expected.
Step 6: Train and Improve Your Chatbot

An AI chatbot gets better with time. Here’s how to train and improve it:
- Analyze Conversations: Review chat logs to identify gaps or misunderstandings.
- Add More Intents: Expand the chatbot’s capabilities based on user queries.
- Use Machine Learning: Platforms like Dialogflow automatically improve the chatbot’s responses over time.
FABRIC Tip: Regularly update your chatbot to reflect changes in your products, services, or FAQs.
Step 7: Monitor Performance

Track your chatbot’s performance to ensure it’s meeting your goals. Use metrics like:
- Engagement Rate: How many users interact with the chatbot?
- Resolution Rate: How many queries are resolved without human intervention?
- User Satisfaction: Collect feedback through quick surveys (e.g., “Was this helpful?”).
Bonus: Advanced Features to Consider
Once your chatbot is up and running, you can add advanced features to make it even better:
- Multilingual Support: Use NLP to support multiple languages.
- Integration with APIs: Connect the chatbot to your CRM, payment gateway, or email system.
- Voice Capabilities: Add voice recognition for hands-free interactions.
- Personalization: Use user data to provide tailored responses.
Conclusion
Building an AI chatbot for your website doesn’t have to be complicated. With the right tools and a clear plan, you can create a chatbot that enhances user experience, saves time, and boosts engagement.
By following this step-by-step guide, you’ll have a fully functional AI chatbot up and running in no time. So, what are you waiting for? Start building your chatbot today and take your website to the next level!
-FUTUREFABRIC